THE APP-BLOCKS SUPPORT (update 2022)
THE GIVEN TUTORIAL EXPLAINS HOW TO SET UP THIS FEATURE FOR THEMES THAT DON'T HAVE THE APP-BLOCKS SUPPORT. FOR NEW THEMES THAT HAVE TEH APP-BLOCKS SUPPORT SETUP IS A LOT EASIER:
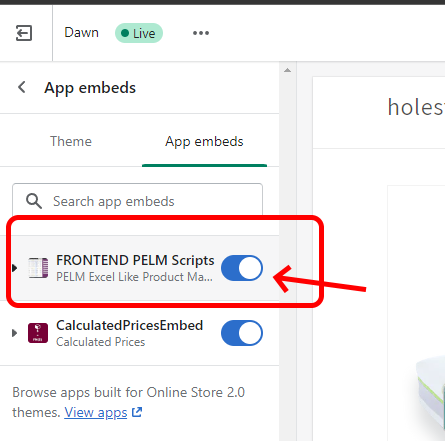
- CHECK IF YOUR THEME SUPPORTS THE APP-BLOCKS (if you see anyware "Add Block" option in customizer)
- (if above is yes) ENTER THE THEME CUSTOMIZER , THEN "Theme Settings", THEN "App Embeds" and turn on "FRONTEND PELM Scripts" and save (this replaces need of placing script tag inside your theme liquid files).
ADDITIONALY:
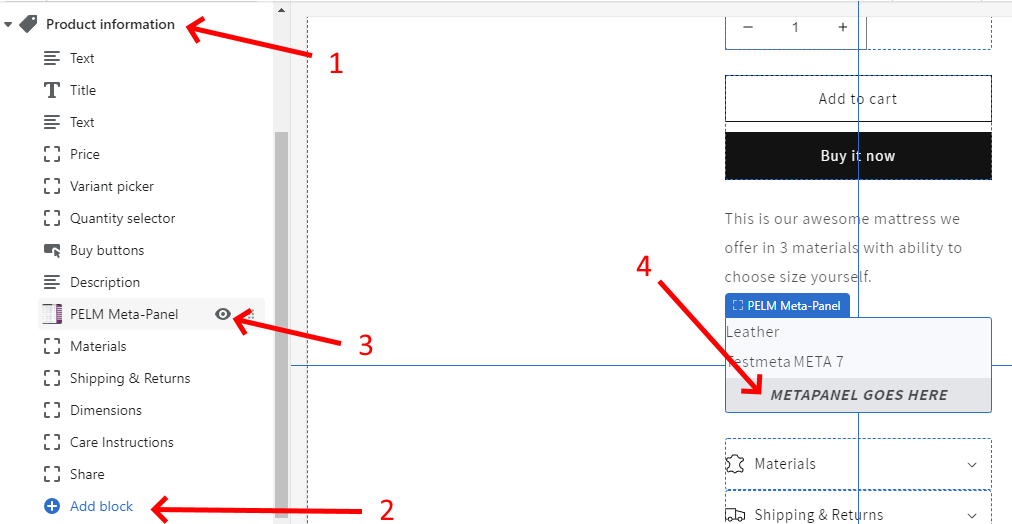
IF YOU USE THE AUTOMATIC TABLE CONCEPT AND IF YOU DONT LIKE A DEFAULT METAPANEL POSITION YOU CAN ALSO USE AN APP-BLOCK TO PLACE IT IN ANOTHER POSTION. TO DO THIS:
- Enter product page from Shopfy Customizer
- Add app block unde "Product Information" section named PELM Meta-panel and place it in the postion you prefer, save.
TUTORIAL
[ NARRATOR SHOWING THE APP MAIN VIEW, NO FILTERS ARE SET ]
- Hi, my name is [Narrator tells his name] , and today I’m gonna show you how you can easily display nice product specifications or additional fields for products on the Shopify platform. I will use the “ Excel Like Product Bulk Edit ” application. Note that previous name of this application “Spreadsheet Bulk Product Manager”
- On the Shopify platform we use so-called “Metafields” to add our specific custom fields specific to our guds.
- Excel Like Product Bulk Edit is a robust application, with many options, and among other it is an excellent tool for product meta-field editing. This it is the only app on the market with a unique clear spreadsheet interface and import and export capabilities. The Excel Like Product Bulk Edit team has noticed that many users have a need of showing meta-fields on product pages, but for most of them, this is too complicated to do or it is expensive to hire developers to do so. So they have built an option to automatically do so aldought this is a backend App.
- By not touching or writing a single line of code, you can get a nice table showing meta-fields you wish on the product page. Additionally , if you need something more comprehensive, you can also edit LIQUID code in your product.liquid and get extraordinary features. Metafields can be related to products or variants. When a visitor of your site selects another variant the app will automatically update your product page so it will show metafields of the selected variant.
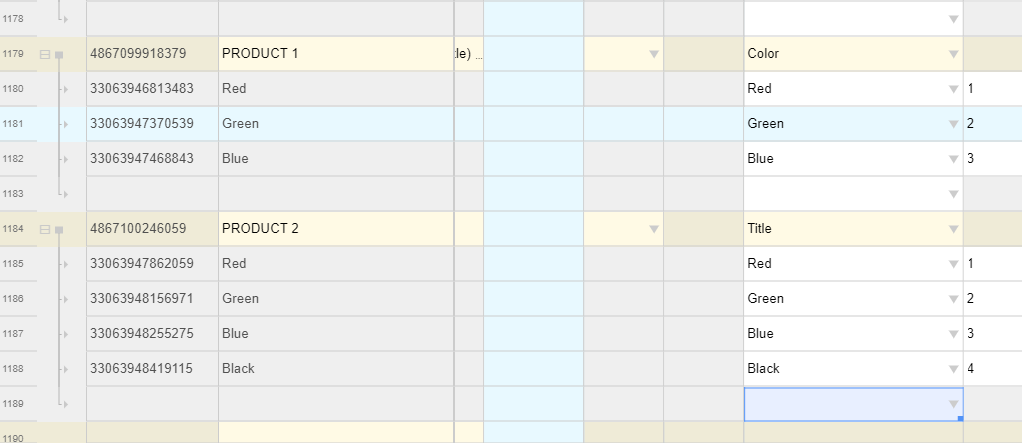
- This is the “ Excel Like Product Bulk Edit ” app main view, I will now create two products with a few variants we will use for this demonstration.
[NARRATOR CREATES TWO PRODUCTS BY ENTERING DATA GIVEN IN FOLLOWING TABLE WHILE RECORDING:
|
|
Option 1 |
Price |
Stock |
Published |
|
MY PRODUCT 1 |
Color |
|
|
yes |
|
Var 1 of MY PRODUCT 1 |
Red |
10 |
99 |
|
|
Var 2 of MY PRODUCT 1 |
Green |
11 |
99 |
|
|
Var 3 of MY PRODUCT 1 |
Blue |
12 |
99 |
|
|
MY PRODUCT 2 |
Color |
|
|
yes |
|
Var 1 of MY PRODUCT 2 |
Red |
10 |
99 |
|
|
Var 2 of MY PRODUCT 2 |
Green |
11 |
99 |
|
|
Var 3 of MY PRODUCT 2 |
Blue |
12 |
99 |
|
|
Var 4 of MY PRODUCT 2 |
Black |
13 |
99 |
|
]
- Now, let’s define our metafield columns in the app. Note that you do not need to define metafields as some system term. . By defining the column for metafield you just create an interface to target metadata by namespace and key pair. This means you can also access metafields set by other apps or also this means that removing column definition will not remove meta-fields for products or variants. If you remove and add columns later, you will notice that values stay as you left them.
- Metafield columns, for this app, are managed in Config -> Settings. [NARRATOR Enters Settings]
- Here we see the all APP Settings and here we see our metafield columns [NARRATOR SCROLLS DOWN SETTINGS POPUP] .
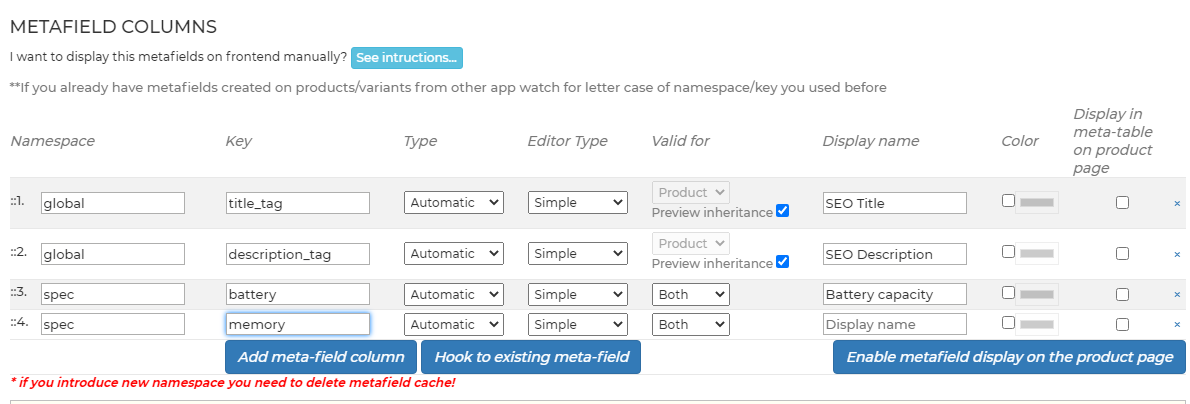
- So as already said two most important things regarding metafield are namespace and key. These two identify the metafield uniquely.
- Let’s create our first metafield. We will set namespace to spec and key to battery. We will leave Type as automatic. I will just note that if you want to wrap your field value with a value formatter you can select some other option. Selecting “Integer” type would only allow you later to enter integers or value will otherwise be refused. For editor type I will also just leave “Simple”, that will correspond to a simple text-box and of course if you need you may use other types. “Valid for” specifies will the metafiled be only available for product, variant or both . If you put here ‘variant’ for example you will not be able to input it for the product. This will also affect how the filter works. It is usual to select “variant” or “product” here because you probably want to prevent mistakes during input , but I will just leave “Both” as we need this for demonstration. “Display name” is how we want to name our column in spreadsheet and as well what will be displayed for the field label on frontend. We will enter “Battery capacity” for the Display name. If we leave it empty the app will use a generic name, which is not particularly user friendly. We can select the color of the column for easier viewing in the backend GUI.
At the end we have this checkbox in the column called “ Display in meta-table on product page ”. If we check this field this means that the app should automatically display this meta-field on the product page. If we want to use an element binding approach there is no need to check this. We will check it for now
Let’s add another one. We will set namespace “spec” and key “memory” . We will leave the Display name empty. We will also check “ Display in meta-table on product page ” for now.
- Before we can see our meta fields on the frontend, we need to do one important thing. We need to place a script tag into our theme. The script we are referencing is a script that will do a metafield displaying for us. In 99% of cases we actually just need to click on this button called “Enable Metafields on Frontend '' . In some rare cases, for some specific themes, the app may be unable to do this for you , and you will have to place the script manually or contact Holest Engineering support for further instructions. [NARRATOR Clicks the button “Enable Metafields on Front-end ']
As we see the app successfully placed script tag , we can now proceed. I will now save the metafileds we defined.
[NARRATOR SAVES THE SETTINGS]
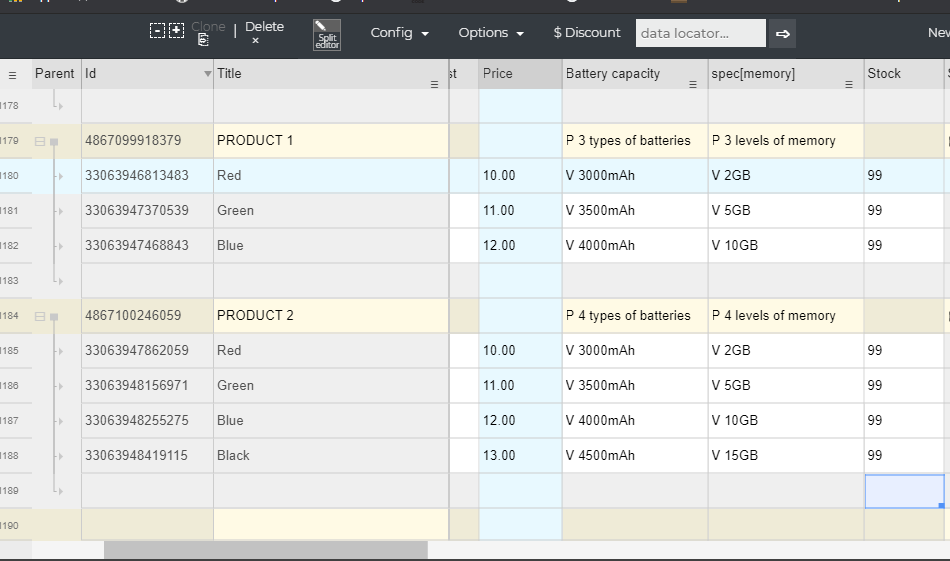
- Let’s now enter values for these two metafields , for products we created earlier. You see that app made columns for our metafields , and we can fill these columns with values. Both product and variant cells are editable, as we selected in their settings to be like that. For demonstration purposes I will start each value with letter P for product and letter V for valiant.
[
NARRATOR ENTERS METAFIELDS BY USING DATA FROM GIVEN TABLE:
|
|
Option 1 |
“Battery capacity” spec[battery] |
spec[memory] |
|
MY PRODUCT 1 |
Color |
P 3 types of batteries |
P 3 levels of memory |
|
Var 1 of MY PRODUCT 1 |
Red |
V 3000mAh |
V 2GB |
|
Var 2 of MY PRODUCT 1 |
Green |
V 3500mAh |
V 5GB |
|
Var 3 of MY PRODUCT 1 |
Blue |
V 4000mAh |
V 10GB |
|
MY PRODUCT 2 |
Color |
P 4 types of batteries |
P 4 levels of memory |
|
Var 1 of MY PRODUCT 2 |
Red |
V 3000mAh |
V 2GB |
|
Var 2 of MY PRODUCT 2 |
Green |
V 3500mAh |
V 5GB |
|
Var 3 of MY PRODUCT 2 |
Blue |
V 4000mAh |
V 10GB |
|
Var 4 of MY PRODUCT 2 |
Black |
V 4500mAh |
V 15GB |
]
- Ok, we can now go to our front-end and see what we got. Let’s open our first product [NARRATOR double-clicks cell of View.. column of MY PRODUCT 1 and he is redirected to product page front-end]
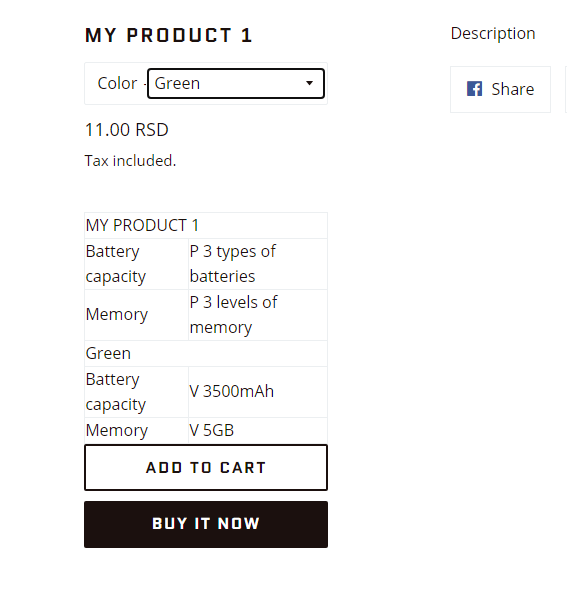
- We see this table containing metafields we entered. We see meta for product and we also see meta for the variant selected by default ( first choice). I will now choose another variant to see what happens. [NARRATOR SELECTS THE SECOND COLOR TO SHOW HOW META TABLE DATA CHANGES BASED ON VARIANT SELECTED] . We see that boxes related to the variant have updated to correspond to current color. And we also see that also for the third variant [NARRATOR SELECTS THE THIRD COLOR TO SHOW HOW META TABLE DATA CHANGES BASED ON VARIANT SELECTED].
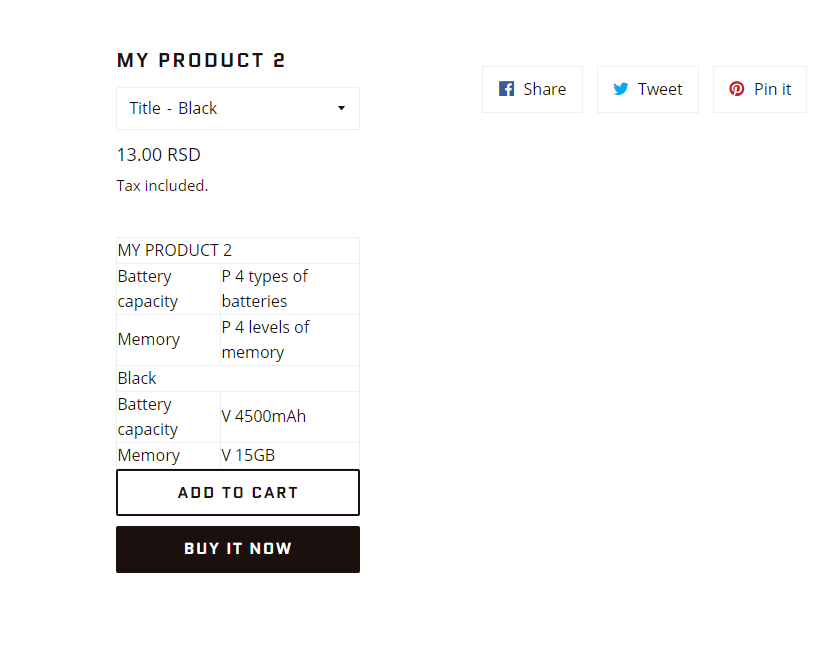
Let’s see our other product [NARRATOR uses search to locate and enter MY PRODUCT 2] . We see the table for it also [NARRATOR CHANGES a color few times to show how the metafield table changes based on the selected variant].
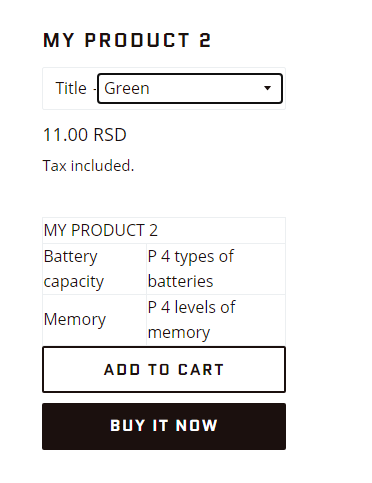
If you don’t want to display anything for a product, or some variant it is sufficient to just delete those values. [NARRATOR returns to the app view and he deletes values of the green color FOR MY PRODUCT 2 in above table (V 3500mAh AND V 5GB). NARRATOR RETURNS TO PRODUCT TAB. NARRATOR REFRESHES THE PAGE, SELECTS Green]
Wee see that we don’t have meta that was set for the Green variant. We do see meta for the product because we did not remove it, but there are no longer V 3500mAh AND V 5GB displayed for the green variant. If I select Red [NARRATOR SELECTS Red VARIANT] you see that we see that Red has its variant metas.
|
|
|
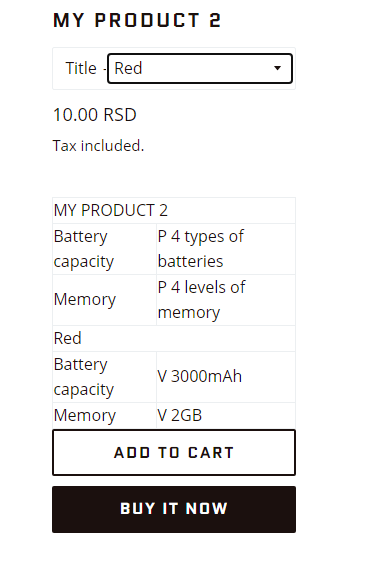
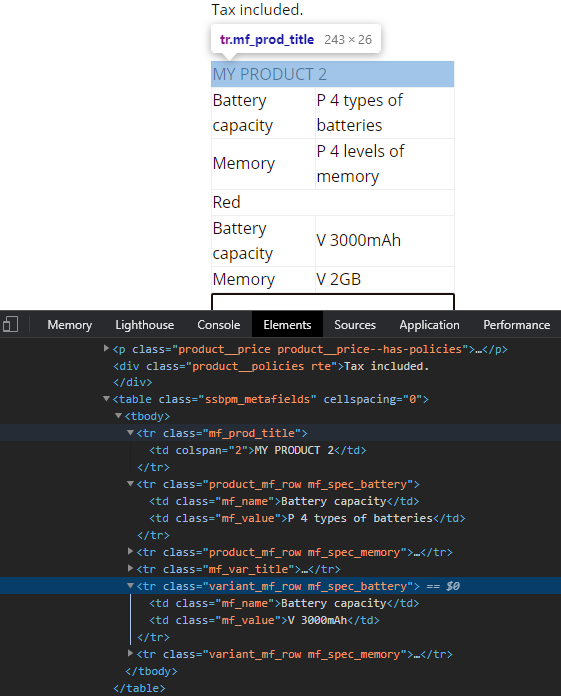
This table has some default style and look so it could be put on most of the sites. Of course you can use CSS , which you can add to your main stylesheet file, to alter its looks. This table and all its inner elements have class defined for you can easily match them with css rules [NARRATOR SHOWS ELEMENTS OF TABLE USING CHROME Inspect FUNCTION] .
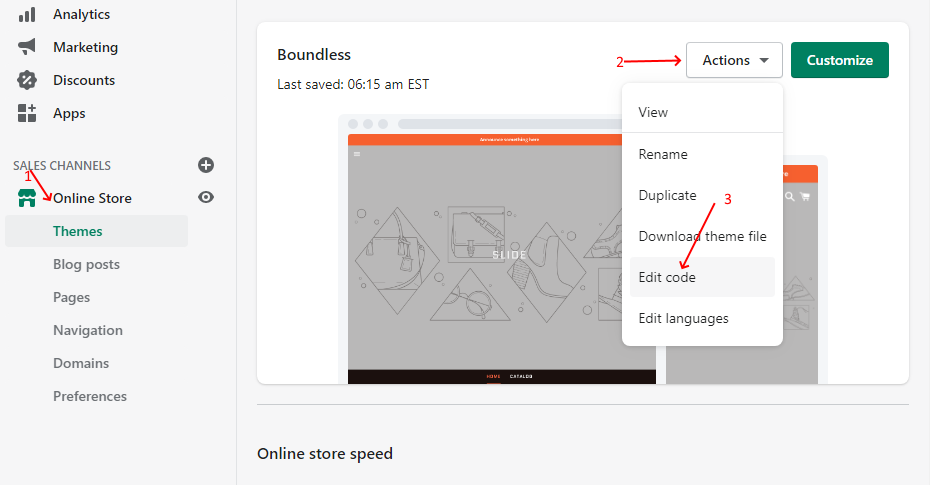
You may also not like the position where this table is placed. I will now show you how to move it to ther place. To move this table we must tell the APP position where it should be injected. We will do that in the product.liquid file of our theme. [NARRATOR GOES to shop administration, then clicks Online store, then opens editing for active theme. NARRATOR opens Templates/product.liquid to edit]
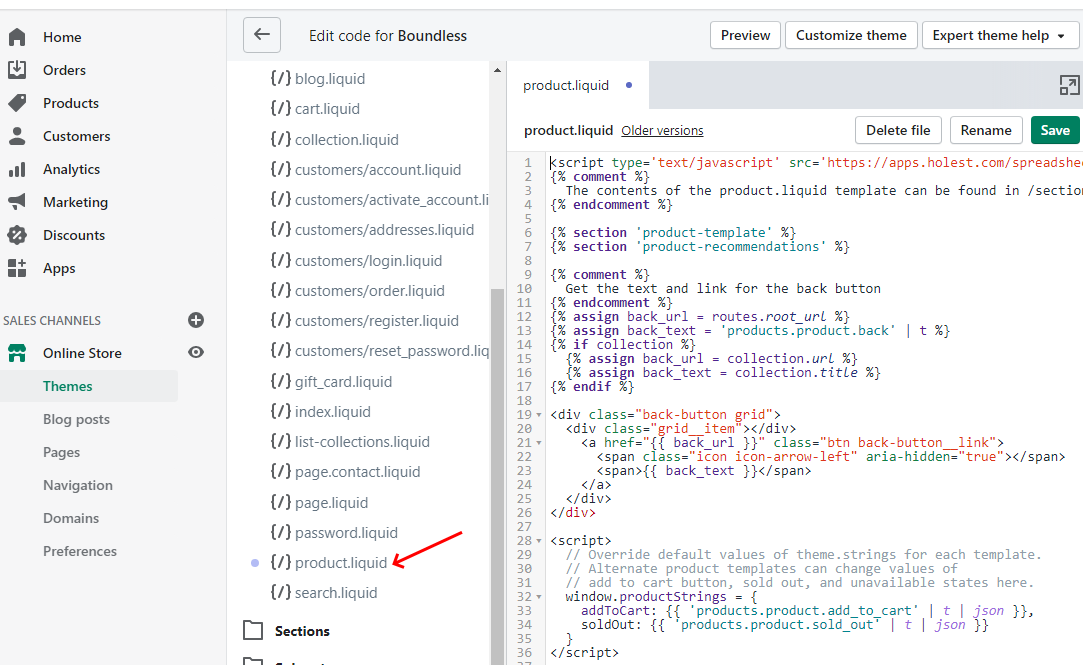
Ok this is our product liquid. We can recognise our product page by looking in this liquid template file. To mark table insertion place, we need to place exactly this HTML code on desired place:
[NARRATOR PICK PLACE BELOW ALL PRODUCT CONTENT ENTERS THERE:
<span class="metatable_placeholder"></span>
]
Code is the span tag with class attribute set to metatable_placeholder
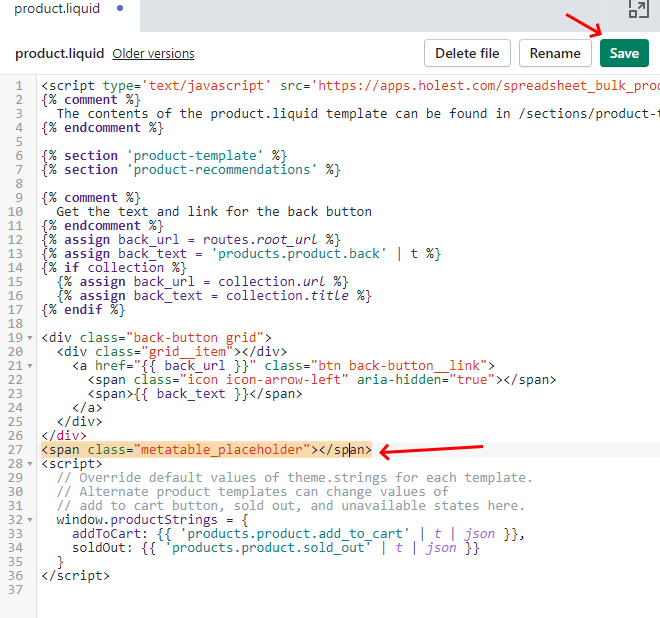
We will save this [NARRATOR SAVES product.liquid] . Let’s see that we got [NARRATOR GOES TO MY PRODUCT 2 FRONTPAGE AND THEN HE REFRESHES THE PAGE]. We see that our table now changed its place.

We maybe need some more freedom with placing our meta fields, and we may also need to fill our custom HTML structure.
We can tell apps just to fill elements we already have or can put ourselves. Let’s try that.
[NARRATOR RETURNS TO product.liquid EDITING]
Let’s place some elements.
[
NARRATOR ENTERS ON START OF product.liquid CONTENT:
<p><labal>Battery: </label><span productmf='spec/battery'></span></p>
<p><labal>Memory: </label><span productmf='spec/memory'></span></p>
<input type=’text’ variantmf='spec/battery' />
<a variantmf='spec/memory' />Even link</a>
NARRATOR SAVES product.liquid
]

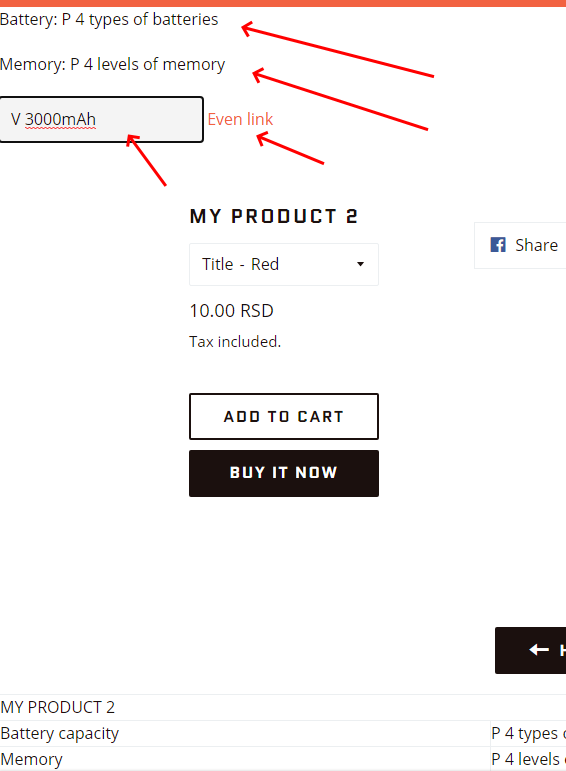
I added INPUT and <a> (Anchor) tags so you can see that the App will recognise that, and treat them differently. I will update spec[memory] to some link so we could see that in action. [NARRATOR ENTERS THE APP, FOR ALL 3 VARIANTS OF MY PRODUCT 1 enters https://google.com for spec[memory]. NARRATOR OPENS MY PRODUCT 1 AND SHOWS BROWSER LINK HINT IN BOTTOM]
We see that as well as tables, we also get values in our elements.We can remove tables if we want.
[NARRATOR enters the APP, then settings. NARRATOR unchecks “Display in meta-table on product page” for all meta columns. NARRATOR SAVES. NARRATOR RETURNS TO MY PRODUCT 1, THEN REFRESHES]
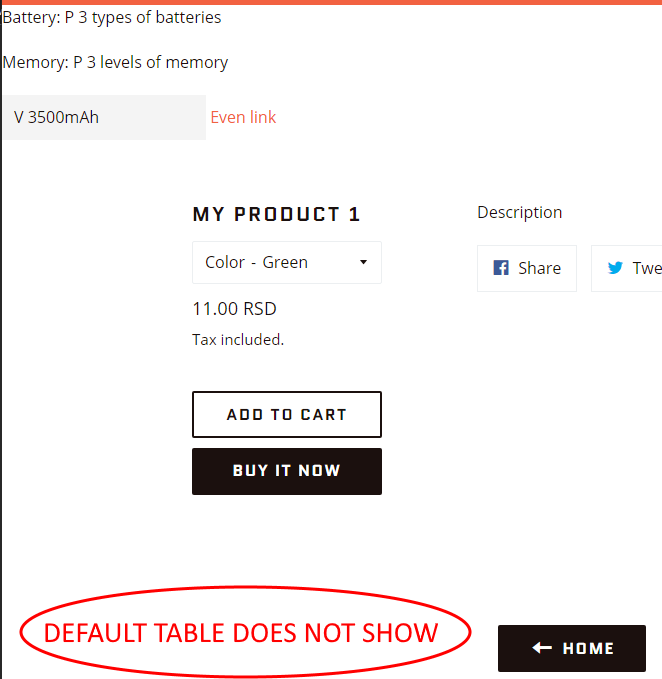
We see that we no longer have the table, but we do have our custom elements.
That’s all for today. Thanks for watching this video!