[ NARRATOR SHOWING THE APP MAIN VIEW, NO FILTERS ARE SET ]
Hi, my name is [Narrator tells his name]. Today I’m gonna show you how you can import product data on Shopify store using the application called “ Excel Like Product Bulk Edit ”. In this session I can show you only a few common scenarios since this powerful import tool allows you to import various data of different formats, and even do tricks with it.
With this APP you can import files containing only a part of your catalogue. It is not required that you import a full catalogue. It is also possible to remove items using import. You can flagg items for removal. You can flag particular variants or whole products. Any column that exists in the APP main grid is importable (of course if the field is not read only) or exportable. So if you for example add a metafield column, it becomes possible to import its value from the import file..
Same as you can import rows containing data you want to change, the same stands for columns. You can import only columns for fields you wish to update. It is just required that you have some item identification , therefore you must include some field, for example like the SKU , to identify products , variants, and fields you want to update.
id is the ultimate identificator, and most prefered way to identify a particular product or variant. Unfortunately id is a bit confusing to people without some IT background. Also a particular id is valid for a one particular site where it was generated. On other sites, same products will have different id-s , and you can not take control over that since id is generated by the system at the moment of item creation. This App uses a parent field, which is a variant referrer for its product. and it is actually the id of the product.
Besides Id and Parent fields , for product identification , you can use title or handle ( handle is textual secondary identification of product and it is also part of URL). The SKU of one of the product variants can also identify a product.
Variant identification can be the SKU, options combination , or its barcode. When matching variants APP will also respect product fields , like handles to narrow down the list of possible candidates. For example, the variant options can be the same for two or more products. In that case the App will first narrow choices to products that match other provided data, and then look for the right variant inside of them. If the app still finds multiple choices it will ask the user to specify what goes where.
Before I run the export I will define one new metafield, so I could later use import to fill its values. [NARRATOR enters settings. NARRATOR defines metafield with namespace: spec, key: Metafiled1 , display name: My Metafield. NARRATOR saves the settings. NARRATOR shows the new metafield column in data grid] .
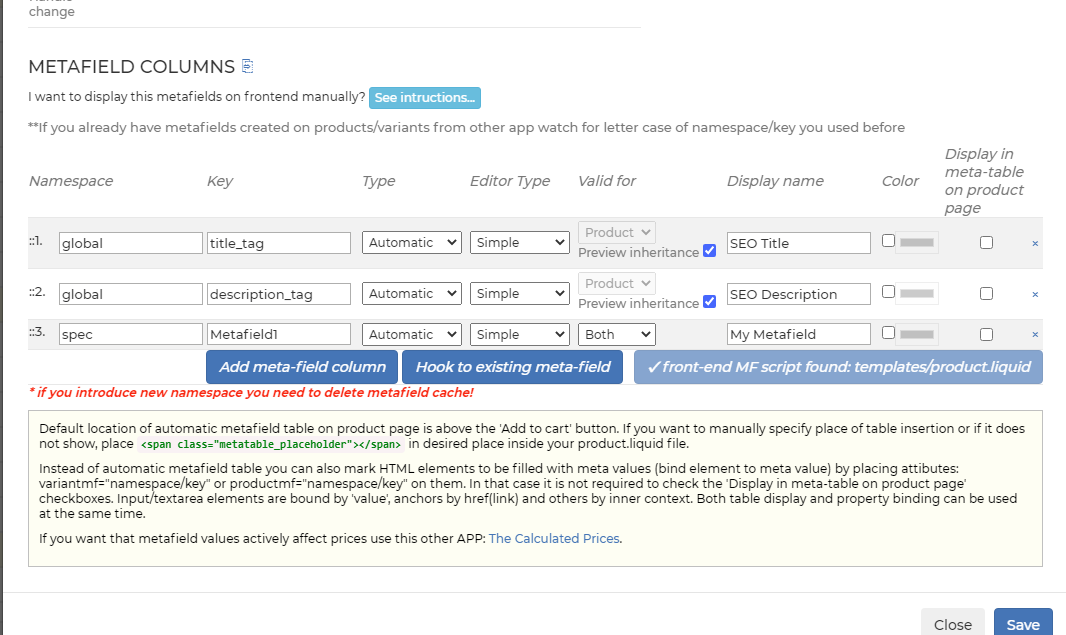
Ok , column for our new meta-field has appeared. We see that it is empty for all products and variants , and we will fill it up using our import.
Ok , now i’m gonna export all the data. I will then make a few changes, and also define data for two new products I would like to add, and then import files prepared like that.
[NARRATOR does data export without any change in export dialog] .
Here is our file.
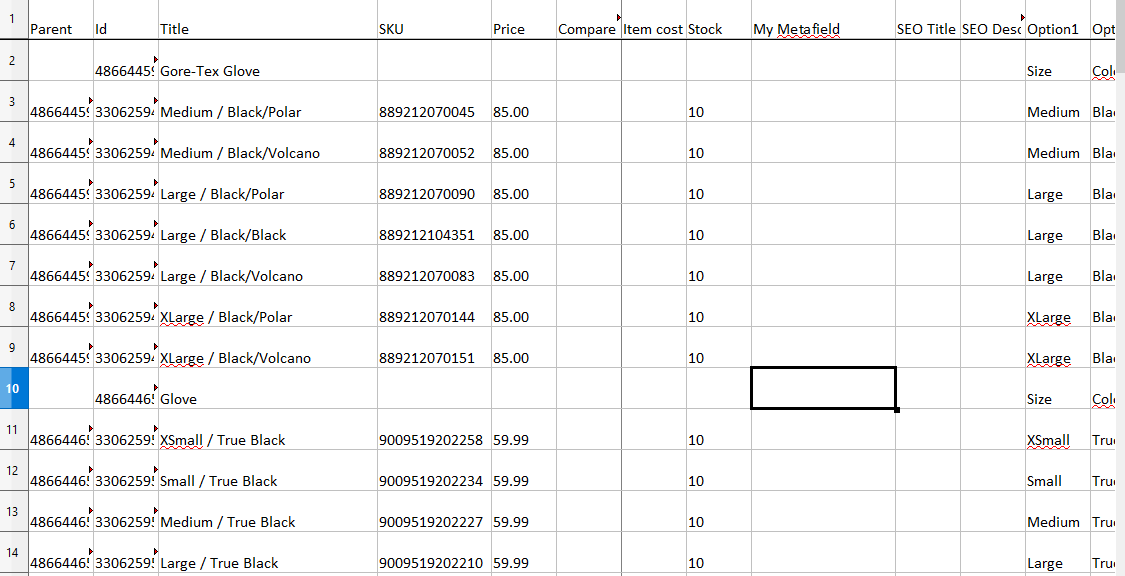
I’m gonna change some data in this exported file now. First I will change some variant prices now.
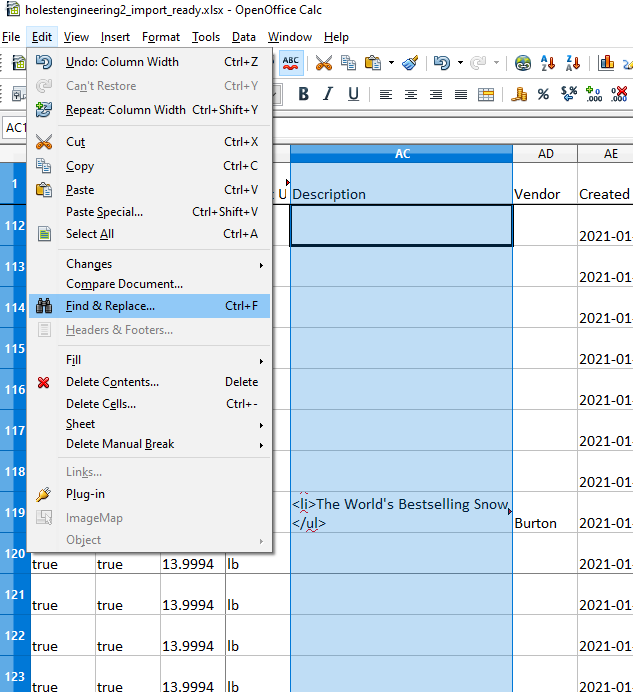
[NARRATOR changes price for random ~20 variants] . I will now change some inventory levels [NARRATOR changes stock for random ~10 variants] . I will also now update the description using Search/Replace. For demonstration purposes I will just do something easy - replace all appearances of word “and” with & [NARRATOR does search/replace for ‘Description’ column “ and ” => “ & ” ] .
Ok , we also want to demonstrate import of the “My Matafield” metafield, so I will set a few values for that [NARRATOR sets value “from import” for My Metafield for random ~10 items]
Finally , let’s also add two new products to our import file.
[At end of data fill new records li this:
|
Parent |
Id |
Title |
Option1 |
My Metafield |
SKU |
Images |
Stock |
Price |
|
|
|
My Imported Product 1 |
Color |
from import |
|
|
|
|
|
|
v |
|
White |
from import |
IMP101 |
https://apps.holest.com/temp/velja2020/raider-helmet-white.jpg |
3 |
120.00 |
|
|
v |
|
Black |
from import |
IMP102 |
https://apps.holest.com/temp/velja2020/raider-helmet-black.jpg |
4 |
130.00 |
|
|
v |
|
Blue |
from import |
IMP103 |
https://apps.holest.com/temp/velja2020/raider-helmet-blue.jpg |
5 |
140.00 |
|
|
|
My Imported Product 2 |
Color |
from import |
|
|
|
|
|
|
v |
|
Black |
from import |
IMP201 |
https://apps.holest.com/temp/velja2020/raider-helmet-black.jpg |
1 |
110.00 |
|
|
v |
|
Blue |
from import |
IMP202 |
https://apps.holest.com/temp/velja2020/raider-helmet-blue.jpg |
99 |
150.00 |
]
You may have noticed that for these new variants we put the letter “v” in the id column. This is actually not required, but if you have overlapping SKUs, this can tell the App explicitly that this is row for a new variant, and this should not try to match it to anything else.
Please just note that , rows for variants must be placed after their product row.
I have set image urls only for variants. App will upload these images for the product , and relate variants to it as we have set here. If we want to upload some additional images, that are not related to any variants, we would simply put them in the Images cell of the product. I will do that now, and will set two additional images for my first new product. [NARRATOR sets:
https://apps.holest.com/temp/velja2020/raider-helmet-green.jpg
for Images cell of the first new product (yellow cell)
]
We will now save our changes [NARRATOR saves file under name containing “import_ready” as a part of file name] . [NARRATOR returns to the app tab] Ok , let’s upload our prepared file now. [NARRATOR opens the import dialog Options->Import] .
This is the first step of the import wizard. [NARRATOR shows file picker with mouse] Here we pick our import file. File can be xlsx , CSV or ODS . Here we see some basic instruction and notes, like this one noting maximal image file size [NARRATOR shows with mouse 5MB text] .
If we need , here we can tell the app to skip all operations that will result in creation of new items [NARRATOR shows with mouse ‘ Only accept updates’ checkbox ] .
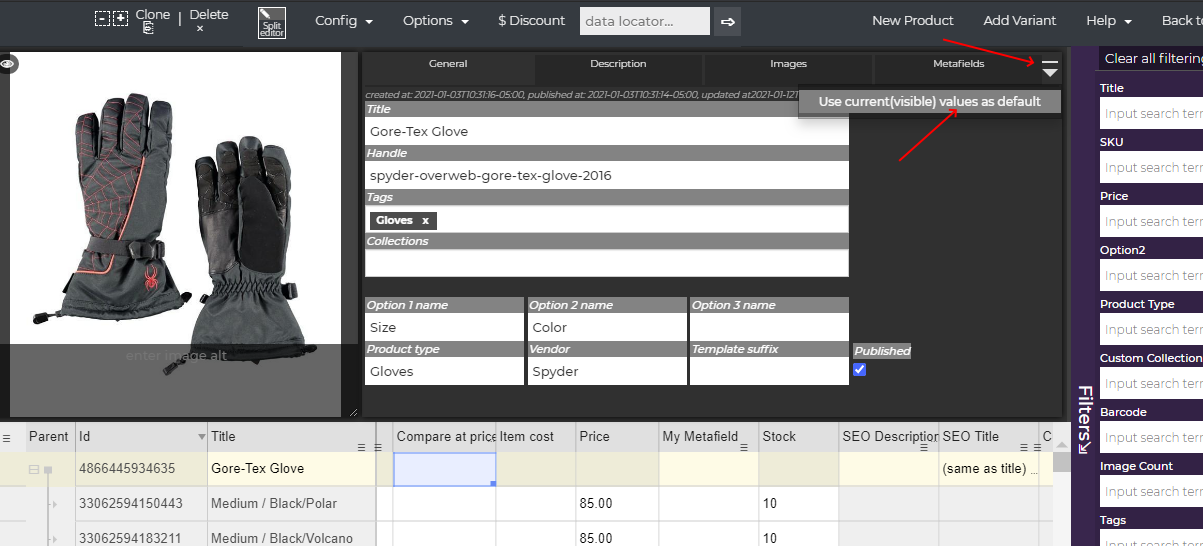
This checkbox here , called “ Use default values” [NARRATOR shows with mouse “ Use default values” filed] will tell the app to fill up new products and variants with default values. Default product or variant values we can define from the split editor top-right menu by picking some product or variant for default one.
{Following image is not a part of video transcript }
If we have Options entered correctly , we should tick “Strict Options Import” [NARRATOR shows with mouse ‘Strict Options Import’ checkbox] otherwise the app will let us have some missing data or mistakes.
Defer images only by name [NARRATOR shows with mouse ‘ Defer images only by name ’ checkbox] will tell the app that it should not consider the path to the image file, and that it should only consider the name of the file itself.
For my import , I will not change any of these settings , because for my current import I don’t actually need them.
[NARRATOR picks the prepared file to import and clicks NEXT]
The second step of import is mapping. This is a process of relating columns of the import file to the products properties. We can also turn off certain fields we don't want to import. The App will try to guess mappings by names, but you also have an option of changing that as you need as sometimes we want to actually do swap or something similar. [NARRATOR maps Stock to Stock]
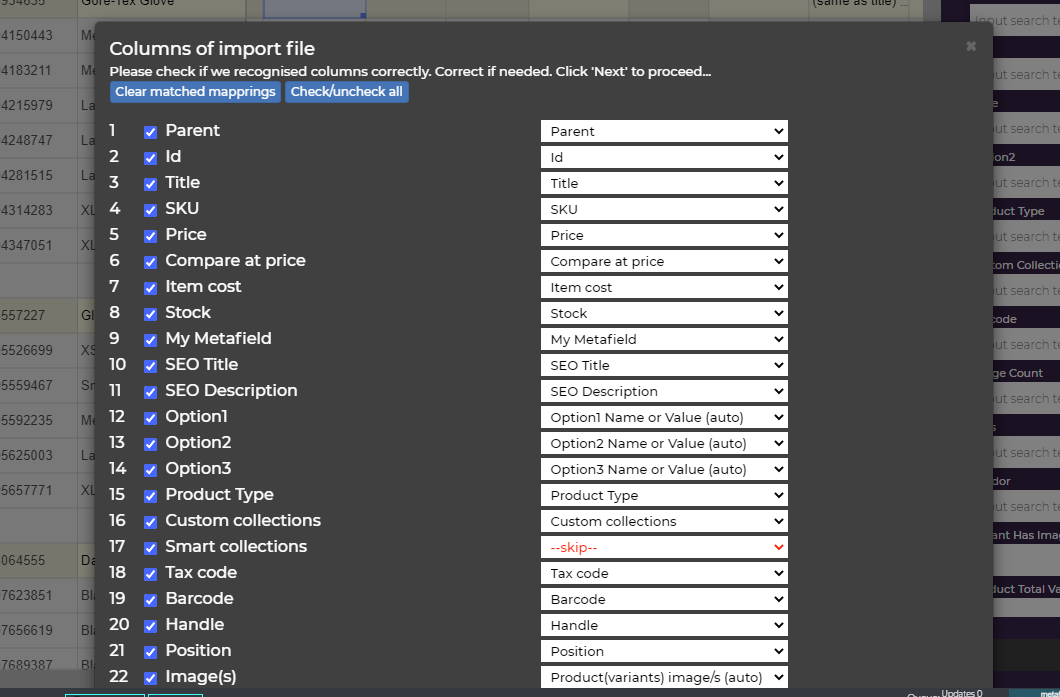
We can also map columns of the import file to generic features. Like [NARRATOR toggles SKU mapping drop down, locates and shows Replacement SKU, then cancels drop-down selection] we see here we have a field SKU, and below it we have “Replacement SKU”. Since SKU is an identification field, we can tell the app that the given value from the import file column is replacement.
We can import the file having two columns old sku, and a new sku. In that case, we would mapp old sku to SKU, and new sku to Replacement SKU.
Also if i scroll this list you see we have a field to mark items for deletion [NARRATOR shows remove item mapping - last in drop-down list, then cancels drop-down selection] .
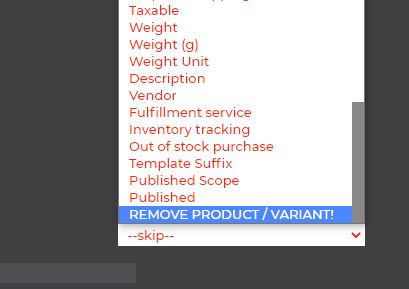
We also see in this list, that for our meta fields, we have the option to take value only for variants or products. Since this app can accept many different data formats, we can use all this to target import as we need.
[ NARRATOR shows My Metafield mappings, then cancels drop-down selection ]

[NARRATOR CLICKS NEXT]
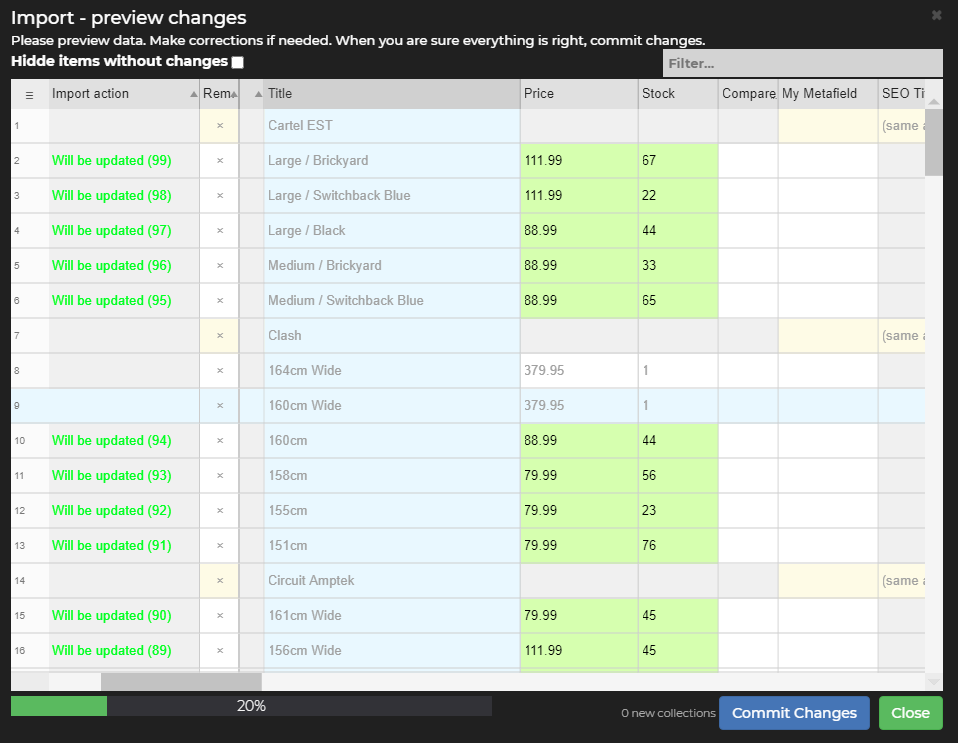
Ok this is the preview screen.
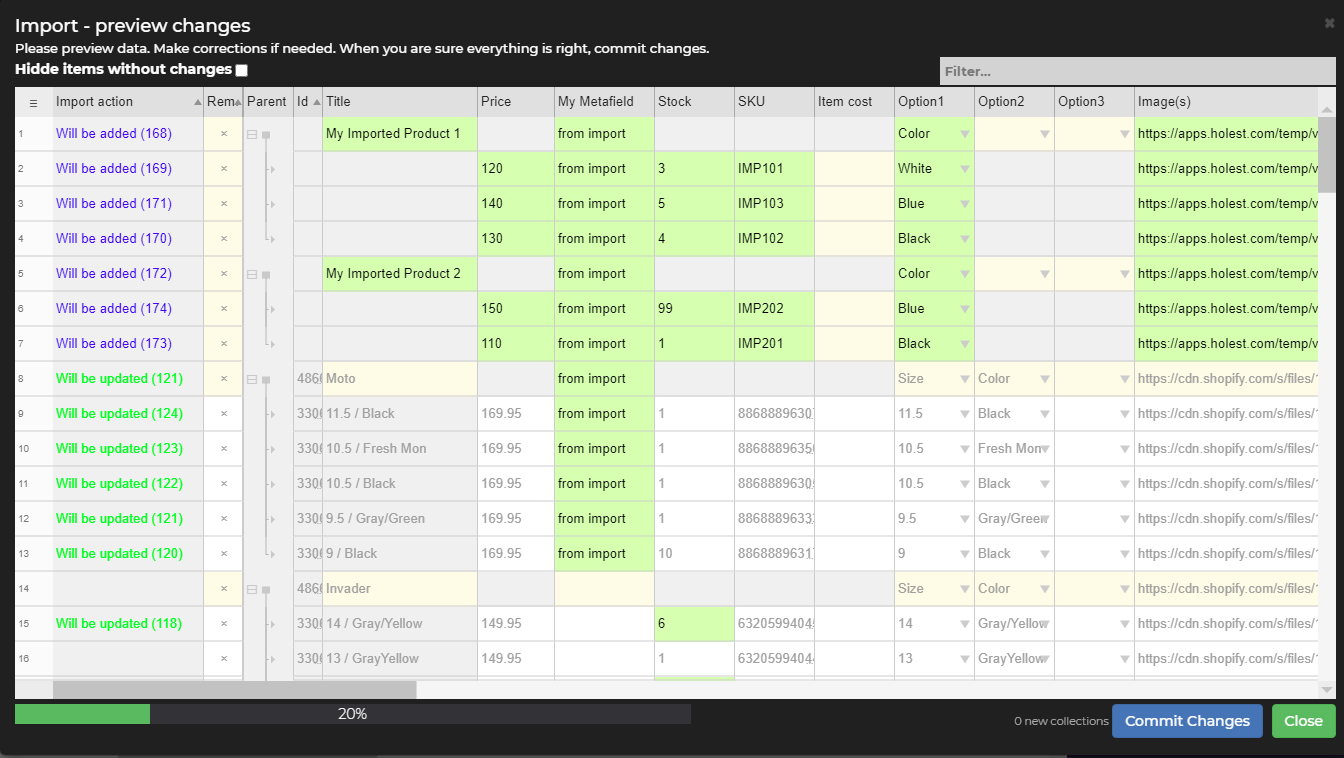
Before we import, we can make sure this is exactly what we wanted to do. The first column app tells us what will happen with this record. So it can be either update, add or delete.
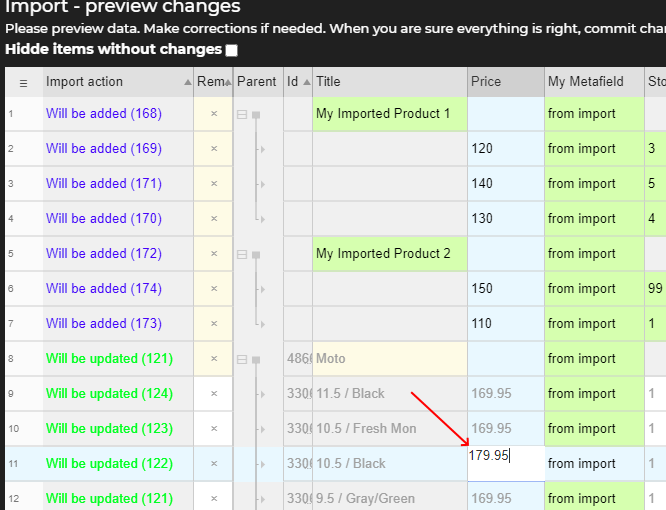
We can also make changes directly here [NARRATOR update few variant prices] .
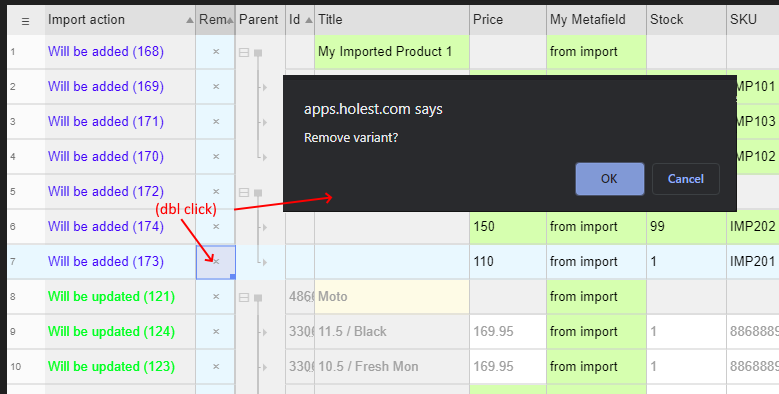
We can also remove records we don’t want to import.
[Delete row in preview grid for last variant of first new product using X button] .
When we are sure this is what we wanted to do, we can click the “Commit” button. [NARRATOR clicks the Commit button. NARRATOR waits for import to finish. When it reaches 100% NARRATOR closes the Import window] .
Ok , our import is done. [NARRATOR shows the main greed. NARRATOR scrolls up / down] . We see that our new data from the import file is here.
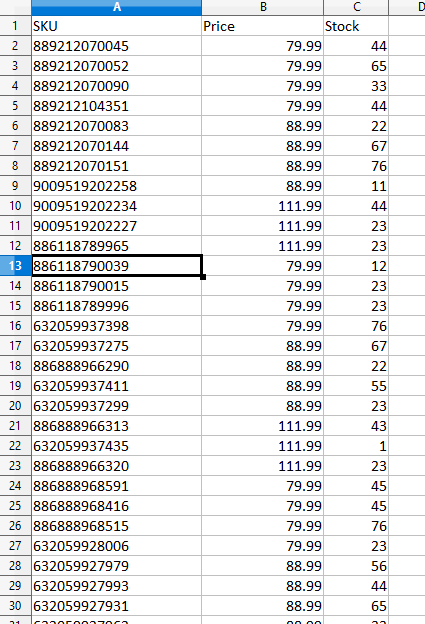
Now I'm gonna import a simple SKU , Price and Stock file [Prepared file SKU_PRICE_STOCK.csv] .
Here , I have prepared a CSV file, containing about half of all my test store skus. Beside SKU this file contains Price and the Stock level. Btw. I will just mention that, the App can also manage multi location stores, - ones that have multiple warehouses. For such stores, the app will have a Stock column for each active warehouse. [NARRATOR shows the context of the file SKU_PRICE_STOCK.csv in Excel app, scroll up / down] .
Ok , let’s import [NARRATOR opens the Import dialog. NARRATOR just selects the file and does not change any other option. NARRATOR click NEXT to get to the Mapping screen.] .
Ok , we will make sure our columns are mapped correctly [NARRATOR adjusts mapping if needed] we can proceed to the preview step [NARRATOR clicks the ‘Next’ button] . We see the App recognised all of our changes of price and stock levels [NARRATOR scrolls import preview grid up/down a bit] .
When we are sure everything is as we want , we then can commit [NARRATOR clicks “Commit” button. NARRATOR waits for the import to finish. While waiting NARRATOR talks text from the next text block ...]
So in this case, I used import to synchronise prices and stock. I could also use a similar file to update anything else. For example , I could import a file that has SKU , and a variant image, or SKU and some custom metfield I use for my products. I could also have some file like this to update product properties . In that case , I could use Handle for identification, and for example I can update images, description, tags, custom collections, or any other field related to the product.
[NARRATOR waits for import to finish (100%). NARRATOR closes import wizard]
Ok , our PRICE and the STOCK field import is completed. We can see our prices and inventory levels are updated successfully [NARRATOR scrolls the main app view up of down showing price and stock column ]
That's all for today. Thank you for watching and have a nice day!